
Airsign unter einer Menge Gasballons. Das Schild ist 100x70cm gross!
Wäre es nicht eine tolle Idee auf einer Feier die Glückwünsche gut lesbar am Himmel zu überbringen ?
Mit Streifen aus WS2812 LEDS kann man einen riesigen fliegende Leuchtreklame bauen, der beliebige Glückwünsche als Lauftext anzeigt – Und die Überbringer der Nachricht können sich sicher sein, daß diese Nachricht lange im Gedächtnis bleibt !
Damit der Buchstabe oder der Lauftext auch fliegen kann muss er sehr leicht konstruiert sein und es notwendig auf das Gewicht der Komponenten zu achten. Denn die Gas-Ballons oder eine Drohne können nur wenige Gramm heben. Zusätzlich ist ein leichter Buchstabe auch bei einem möglichen Absturz bessser um das Verletzungsrisiko zu minimieren.
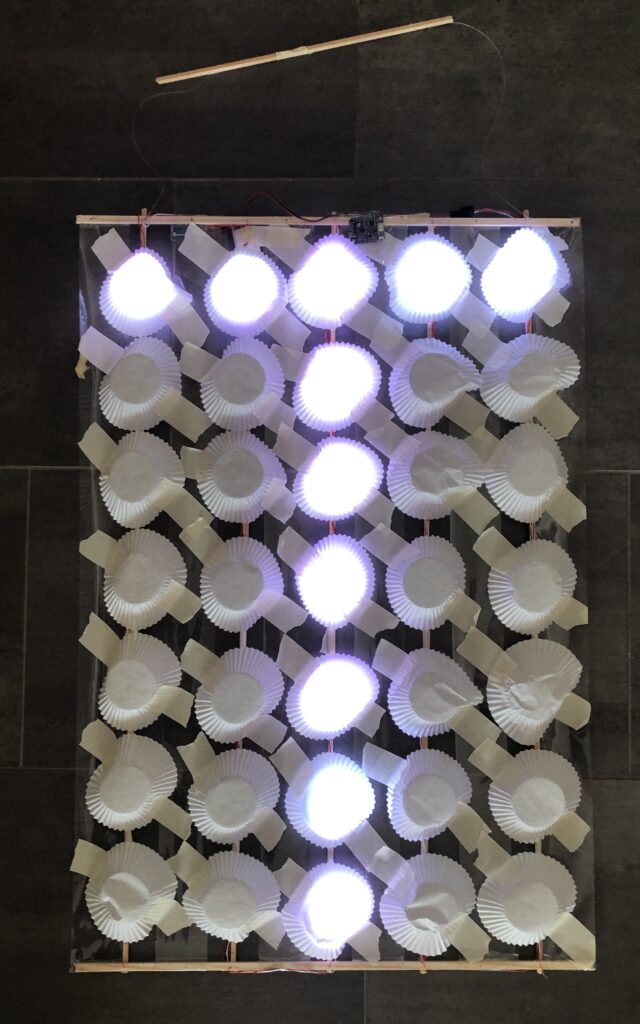
Das einfachste Modell, unser fliegender Buchstabe, besteht aus einer Matrix von 5×7 Pixeln, jede aus einer WS2812 LED. Jede LED beleuchtet genau einen der 35 Muffin Cups. Die Cups dienen als Diffusor. So besteht der Buchstabe aus sehr grossen einzelnen Pixlen, und ist aber trotzdem sehr leicht. Überraschenderweise ist Helligkeit der LEDs kein Problem: eine LED pro Cup reicht vollkommen aus um die Anzeige am dunklen Himmel in ca. 100m Höhe zu erkennen.
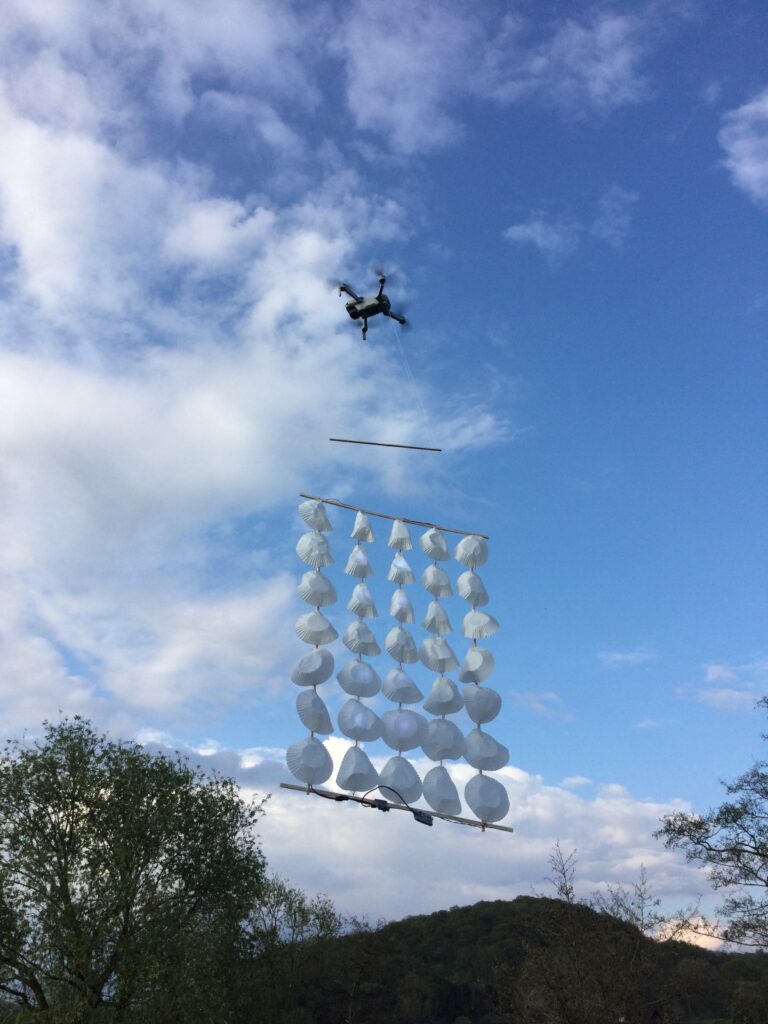
Airsign mit Buchstabe 5×7 Pixel 50x70cm unter einer DJI Mini 2
Hier die grössere Variante mit Styroporschild

Die Anzeige der Buchstaben erfolgt mit Hilfe eines ESP8266 Boards mit eigenem W-LAN Controller. Wir haben das Wemos D1 Mini pro verwendet, da es sehr klein und leicht ist. Der Controller nimmt den Text auf dem einem eigenen WLAN auf einer Webseite entgegen. Nach Eingabe des Textes erledigt er auch gleich die Anzeige. Die Buchstaben werden nacheinander mit variabler Geschwindigkeit und Farbe auf den 5×7 Pixeln angezeigt. Im Link findet sich ein Video, daß den Buchstaben in Aktion zeigt.
Bauanleitung für den Buchstaben:
Wir haben den Buchstaben Muffin – Revolution genannt: Denn außer Glückwünschen kann er natürlich auch andere Nachrichten anzeigen. Aufgrund seiner Konstruktion kann er sehr leicht und schnell irgendwo angeklebt, abgestellt oder aufgehängt werden. Mit der WLAN Fernsteuerung kann er aus der Entferung aktiviert werden und die Texte sind laufend änderbar.
Unser Buchstabe ist 50x70cm gross. Er ist aus 100m Entfernung sicht- und lesbar. Ebenso hat das WLAN des Mini Pro eine Reichweite von ca. 100m. Mittels einer externen Antenne kann die WLAN Reichweite vergrössert werden. Wir haben einen alten Akku aus einer Drohne verwendet, damit war problemlos ein Betrieb von mehreren Minuten möglich.
Konstruktion
Der Buchstabe im Bild oben ist aus leichten Holzbrettchen von ca. 3x3mm oder 2x5mm aus dem Baumarkt gebaut.
Tipp: Wir haben verschiedene Brettchen im Baumarkt auf der SB: Schrauben – Waage gewogen um die leichtesten Bretter zu kaufen !
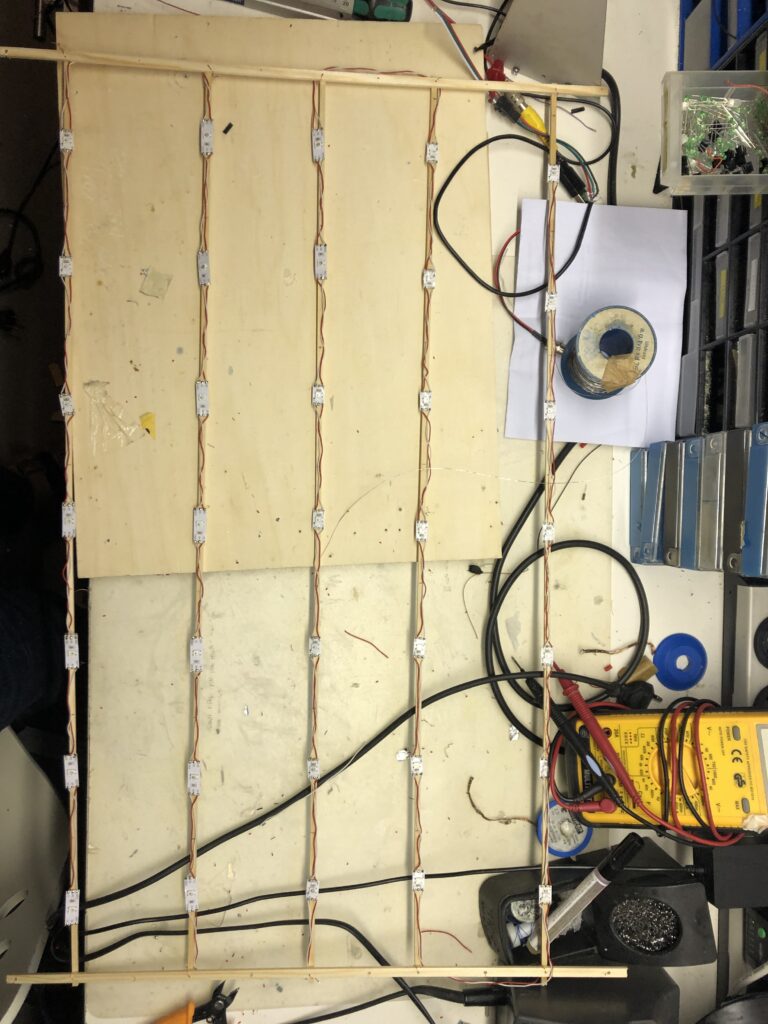
Im Bild 2 sieht man die Konstruktion aus Holzbrettchen. Wir haben 5 Brettchen mit 70cm Länge verwendet und am Ende 2mm Löcher gebohrt. Die Entfernung der LEDS vom Rand beträgt ca. 5cm, der Abstand der LEDS voneinander auch ca. 10cm. Die beiden Quer-Brettchen sind ca. 50cm lang. Der Abstand der 5 Brettchen beträgt auch ca. 10cm voneinander, so dass die Pixel gleiche Abstände in x und y – Richtung haben. Die beiden Quer-Brettchen stehen rechts und links einige cm über. Das ist für die Befestigung der Ballons und die spätere Stabilisierung mit Klebeband notwendig. Auch in die Quer-Brettchen wurden kleine 2mm Löcher gebohrt und die Bretter mit etwas Klingeldraht verbunden.
Montage der LEDs
Nachdem das Holzgitter zusammengebaut wurde werden die LEDs aufgeklebt. Wir verwendet eine „S“ Anordnung der LEDs:
Man fängt an einer Ecke an, und verlegt die Leitungen in einer Schlange über die Brettchen. In der abgebildeten Version werden die LEDs jeweils an der gestrichelten Linie an den Löt-Markierungen abgeschnitten und mit 10cm Kabelstücken verbunden. Immer sofort auf die korrekte Orientierung von Data-Out, Data-In und der Versorgungsspannung achten! Die LEDs verzeihen keine Verpolungsfeher und sind anschliessend defekt ! Vor dem Anschluss also bitte nochmal prüfen. Dann erfolgt der Anschluss an den Controller und ein Test. Wir haben den üblichen 3 Pol-Stecker am Controller und den Leds verwendet um die Controller zu wechseln und Tests zu erleichtern, auch wenn man hier etwas Gewicht sparen könnte.
Montage der Muffin Cups
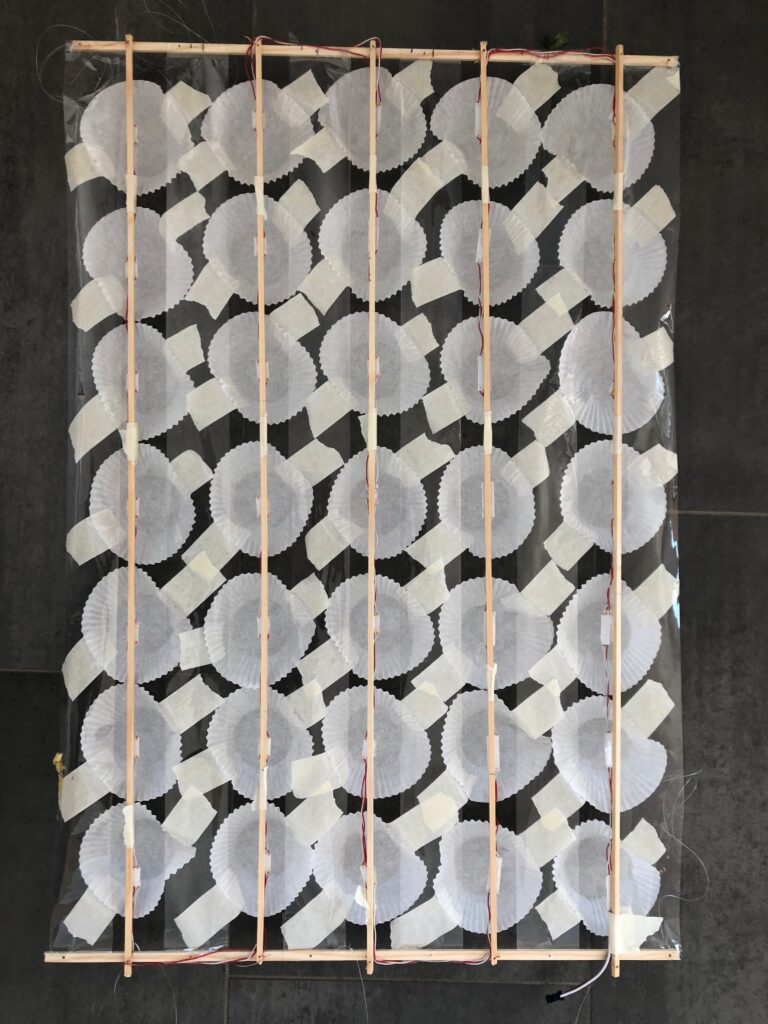
Nachdem die LEDs montiert und getestet wurden erfolgt die Stabilisierung und Montage der Muffin Cups. Im Bild 3 sieht man die Muffin Cups mit Tesa-Krepp streifen. Wenn man genau hinschaut erkennt man das diese auf transparentes Klebeband geklebt wurden.
Zuerst klebt man demnach 6 Klebestreifen aus transparentem Packband zwischen den Querlatten einmal komplett von oben nach unten. Wir haben es nur einseitig geklebt, da es viele Blasen gab. Die Muffin Cups versieht man dann mit zwei Streifen Krepp Klebeband, das kann man leicht entfernen und neu anbringen, und klebt die Cups diagonal – jeweils mittig über einer LED – auf den Klebestreifen auf. Wenn man Krepp-Band verwendet kann man leicht die Position ändern, bis alles einigermassen gleichmässig ausschaut. Die Böden der Cups sollten einen Abstand von 3cm von den LED’s haben, so dass diese ganz beleuchtet werden können. Im Video ist gut zu sehen dass die Cups Ihre Form behalten sollten. Unten rechts sieht man den Anschluss des Strom und Datenkabels.
Stromversorgung:
Für den Betrieb benötig man eine Stromversorgung. Dafür haben wir zuerst eine kleine Power Bank verwendet.
Als Alternative haben wir dann einen alten Akku aus einer Drohne verwendet. Die Leistung reicht für die 35 LEDS und einige Minuten Betrieb noch aus. Zusätzlich ist ein Akku Lader notwendig. Wir haben ein Modell mit Micro-USB Stecker verwendet, das auch einen 5V Ausgang hat. Es gibt verschiedenen Lip Lader, die keine 5 V Ausgang haben sondern reine Lader darstellen. Hier muss man beim Bestellen etwas aufpassen.
Action:
This Video shows the „Muffin Revolution“ in action: The sign is very big ! The Ruler is 30cm long !
Construction:
The „Muffin Revolution“ is made of 35x WS2812 RGB LEDS , a 1x Wemos D1 Mini Pro and a 1xLiPo Battery , and a 1 Cell Lipo Charger(incl. 5VDC/DC). The LEDS are mounted on a grid of wood, for lightweight construction. Other mounting options are possible. The wood sticks are drilled near the Ends to fix them with wire. The Led Strip is mounted on the wood grid In „snake“ order.
The light of the LED is directed to 35 muffin cups. Each cup makes a Dot of the LED character. The muffin cups are used as diffusors, so the Dots are very big. The weight of the complete Character, including battery , Controller and LEDS is approximately 160g, depending on the power source, which allows it to be carried by balloons.
Since it can be enabled via remote control the unit can be positioned anywhere without drawing attention.
Software:
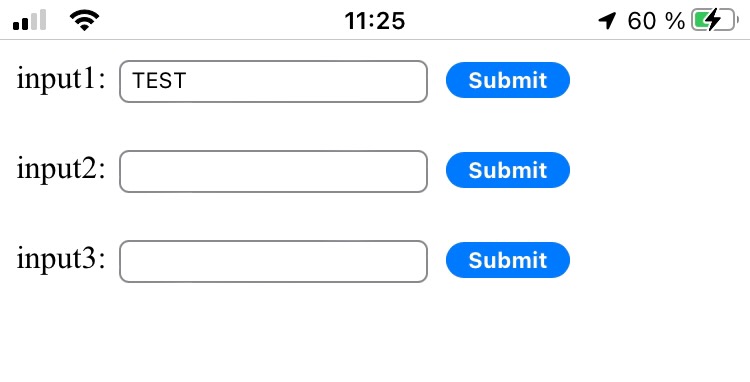
The text is entered via a mobile phone using the web interface of the controller. Therefore I used the standard „WEB Server Example“ from Arduino. The ESP Spans its own Wifi. After you logged into the hotspot via password, you find a simple web page. Allowing to enter text. The „Muffin Revolution“ can show the message until the battery is empty or you just enter empty text… The Controller displays Character after Character in moderate speed. Speed can be controlled by typing a number into the second Text Field „input2“. Input2 controls the delay time between characters. Use values around 500 for low speed, and 300 for very high speed.
The Software allows to display Symbols, like Flags and colored Text. In Filed „Input1“ you can enter any Text. We suggest uppercase letters. Additionally controlled characters are allowed: use <R> for Red, <B> Blue,<G> for Green color – and <W> for White. The software kept simple for general use. It is simple to enhance the software for more symbols or colors and other fonts. Currently is US-ASCII only.
Enhancements:
- For security the remote link can be locked with a security number in another text field..to avoid alternation of the message, after the sign is illuminated.
- E.G.: auto shut-off after 1,2,5 min . This allows unattended operation, in case you are busy. If the display disables automatically – you will have the chance to dismount the unit in unlit state.
Mounting the unit
Since the unit is very lightweight it is simple to mount on windows or buildings, and could be glued by tape or held by wires. In the foto above there is a auxiliary wood panel mounted above the Character to simplify the mounting of the balloons.
Lift in the Sky:
To lift the unit in the sky we suggest transparent balloons which are not disturbing the beauty of the Airsign.
The usage of many balloons increases stability in case some balloons are damaged. Wikipedia says that 1m3 Helium gas could carry 1kg. So if you think of lifting the „Muffin Revolution“ by balloons, you may need many balloons and select material for extreme lightweight. Approximately we need more than 160l of balloon volume. This maybe 30-50 balloons.
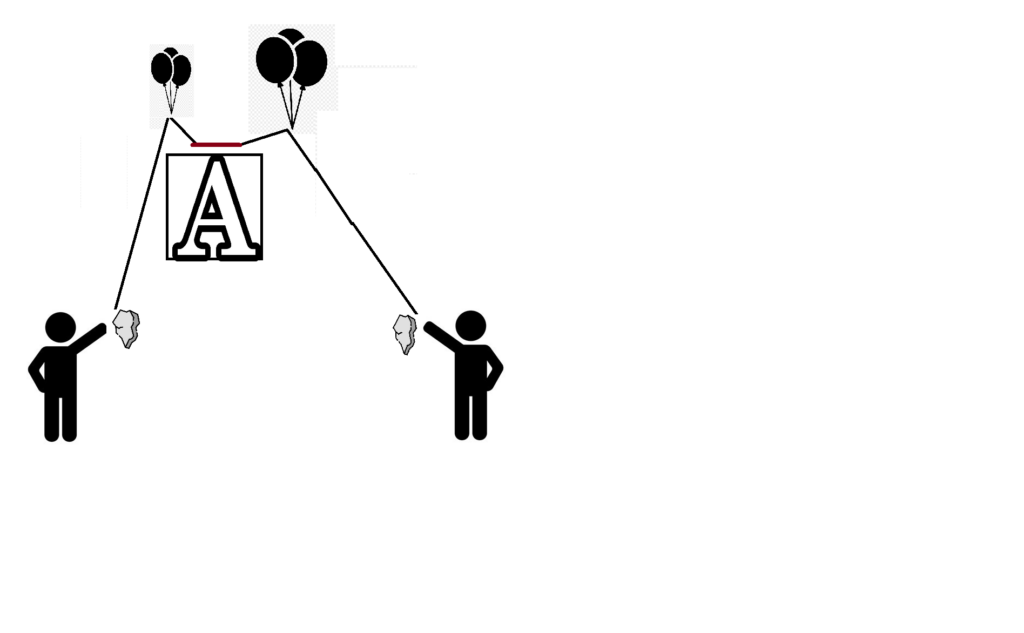
Stable operation
Also I suggest two operators, and use two ballon strings, in an „M“ shape setup. The two operators hold the system at the Ends of the M. This makes it more resistive to wind and simplifies positioning. After Setup, the operator could supervise operation and enter the text from an optimal position. After operation, empty text can be entered to power off and one of the two strings (eg. left person) can be cut. Then the Airsign can be pulled down safely at the second position (right person).
Drone Operation:
Lifting with a Drone is also possible. We tested it with a DJI Mini2 and a standard Power bank. This Setup had more than 200g of weight. The Drone had to work very hard to lift the Character and got very hot. We suggest Mavic or stronger Drones and optimize weight. Also drones are very loud and their lights disturb the character effect.
Attention: It maybe absolutely illegal to fly a Airsign with a Drone. Please see legal information if you lift material with a Drone !
Material:
- ESP WeMos D1 mini pro
- 1m LED Strip WS2812B 60Leds/m (35 single WS2812 LEDS)
- 35 or more Paper Cups for Muffins
- Wood bars 7x2m of 3x5mm or similar
- Mini Lipo Cell and Battery Charger Module
- Transparent nylon thread 2x100m 0.5mm
- Adhesive Tape transparent 70mm wide
- Transparent balloons
- Balloon gas
- Solder iron and wires
- Time: 3h
Theoretically we need only 35 LEDs, but these have to be soldered together at approximately 10cm space, which caused a lot of work.
Construction Enhancement and simplification:
To simplify the construction we plan to use a complete 5m LED strip 30LEDS/m without modification, this eliminates the need to cut and solder and just do not operate the LEDS in between. This also allows for more brightness and variable sizes.
Instructions
At first construct the wooden grid, so that the Leds would all fit on it in a snake arrangement. Start at left top, which is the connector for the LEDS. After that use some transparent adhesive to drag stripes between the wood bars. This stabilizes the construction and these are used to mount the paper muffin cups. Mount a cup between two transparent strips by using additional self adhesive tape. Make sure at least one led directs to a center of a cup. Solder the ESP Controller and the battery. Download the software to the controller via the Arduino IDE. Output to LEDS is D4 Pin, just beside 0V and 5V pin on the mini pro board. Also solder battery to charger B+ and B- pins and out pins to 0V/5V of the D1 mini board. Compile and transfer. Start the software and get used to it. Mount the balloons as described. Do tests before real launch!
Here you can see the construction made of 2x5mm and 3x3mm wood Elements of 70×50 cm:
This is the back view. The transparent Tape stripes are a bit hard to identify. These stabilize the unit. You see the Muffin Cups and the backside of the LED illuminating them. The Cups are mounted on the wide clear adhesive Tape strips. It is important to mount the cups with a distance between the LED and the Cup surface. So the Cup is illuminated completely.
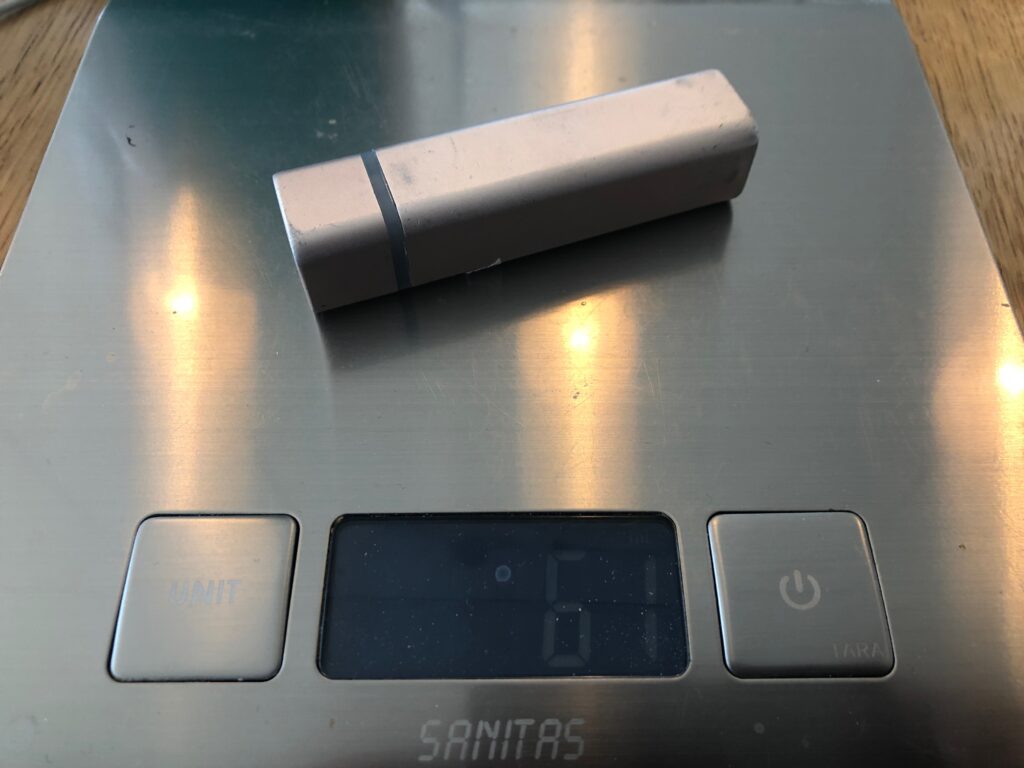
A Standard power bank weights 60g. This is much too much for the flying muffin revolution
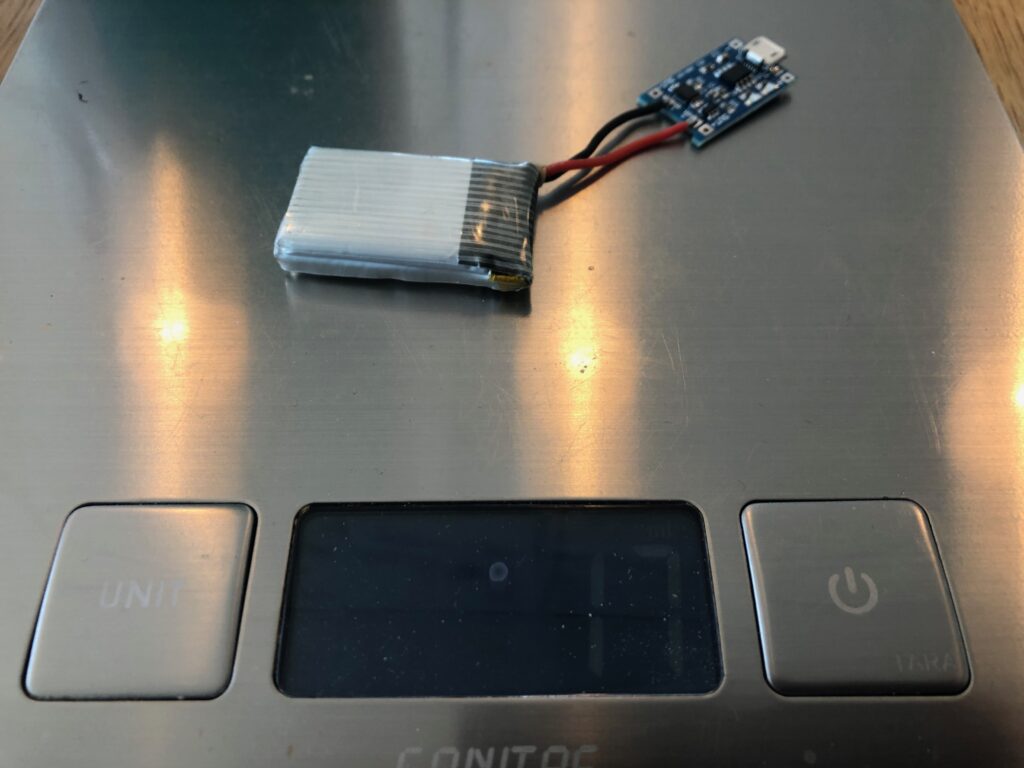
The battery from a drone with the charger/converter is only 17g.
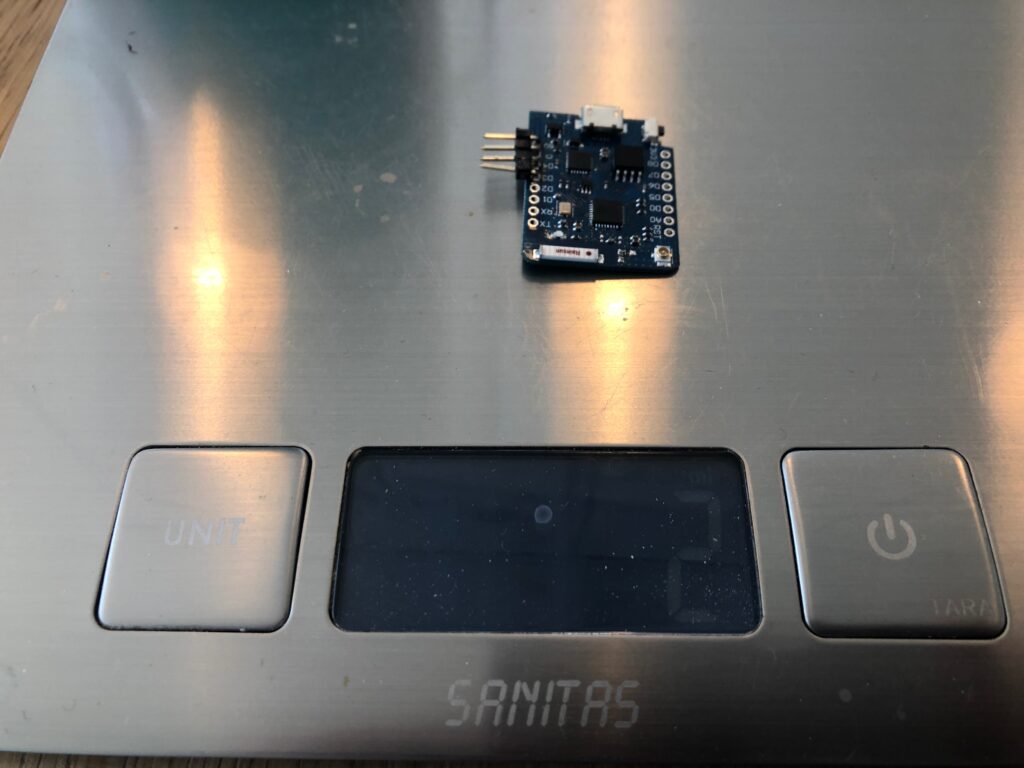
The ESP8266, D1 mini pro module is very lightweight. The connector is used for test only. direct soldering saves some weight.
Security Advice:
I strongly advise to check if lifting of Airsigns is allowed in your country and how this will be prosecuted. I am pretty sure that there maybe legal issues if the unit hit people when going down. Please check before lifting and testing a Character. Also there maybe regions where demonstrating and display of personal opinion is prohibited. I will not be held responsible for problems rising from that.
CODE:
For Airsign Scroller 15×7 Pixel
/*********
 * AIRSIGN SCROLLER

 * (c)2022 Dr. Armin Zink
 * 15x7 Pixel, start unten links,
 *
 * schlange von unten links nach rechts verlegen, dann eine Zeile hoch mit P_Y_EXTRA "verlorenen" leds
 * blog.digital-image.de
 *
 * set these according to your matrix in calculate_pixel_matrix
 *
 *
 *
#define P_Y_EXTRA 3
#define P_START 1 // nach dem Stecker eine "verlorene" LED
#define P_INTERLEAVE 2 // jede 2. LED wird genutzt.
#define P_NUMY 7 ZEILEN
#define P_NUMX 15 SPALTEN


 * based on:
 * ESP8266 WEB SERVER Example by  Rui Santos

  Complete project details at https://RandomNerdTutorials.com/esp32-esp8266-input-data-html-form/

  Permission is hereby granted, free of charge, to any person obtaining a copy
  of this software and associated documentation files.

  The above copyright notice and this permission notice shall be included in all
  copies or substantial portions of the Software.
*********/

#include <Arduino.h>
#ifdef ESP32
  #include <WiFi.h>
  #include <AsyncTCP.h>
#else
  #include <ESP8266WiFi.h>
  #include <ESPAsyncTCP.h>
#endif
#include <ESPAsyncWebServer.h>
#include <Adafruit_NeoPixel.h>
#ifdef __AVR__
 #include <avr/power.h> // Required for 16 MHz Adafruit Trinket
#endif


#define SSID     "AIRSIGN"
#define PASSWORD "12345678"

// START WEB SERVER ON PORT 80
AsyncWebServer server(80);


// Which pin on the Arduino is connected to the NeoPixels?
#define PIN         D3
#define NUM_LEDS    228

bool cyrillic = false;

// When setting up the NeoPixel library, we tell it how many pixels,
// and which pin to use to send signals. Note that for older NeoPixel
// strips you might need to change the third parameter -- see the
// strandtest example for more information on possible values.
Adafruit_NeoPixel pixels(NUM_LEDS, PIN, NEO_GRB + NEO_KHZ800);

static const uint8_t System5x7[] PROGMEM = {
    0x0,
    0x0, // size of zero indicates fixed width font, actual length is width * height
    0x05, // width
    0x07, // height
    0x20, // first char
    0x60, // char count

    // Fixed width; char width table not used !!!!

    // font data
  0x00, 0x00, 0x00, 0x00, 0x00,// (space)
  0x00, 0x00, 0x5F, 0x00, 0x00,// !
  0x00, 0x07, 0x00, 0x07, 0x00,// "
  0x14, 0x7F, 0x14, 0x7F, 0x14,// #
  0x24, 0x2A, 0x7F, 0x2A, 0x12,// $
  0x23, 0x13, 0x08, 0x64, 0x62,// %
  0x36, 0x49, 0x55, 0x22, 0x50,// &
  0x00, 0x05, 0x03, 0x00, 0x00,// '


  0b00000000,
  0b00001110,  //  Zeichnet ein Herz, wenn () verwendet wird.
  0b00111111,
  0b00111111,
  0b11111110,   //Bit7  !

  0b11111100,  // )
  0b01111110,
  0b00111111,
  0b00111111,
  0b00001110,


  //0x00, 0x1C, 0x22, 0x41, 0x00,// (
  //0x00, 0x41, 0x22, 0x1C, 0x00,// )
  0x08, 0x2A, 0x1C, 0x2A, 0x08,// *
  0x08, 0x08, 0x3E, 0x08, 0x08,// +
  0x00, 0x50, 0x30, 0x00, 0x00,// ,
  0x08, 0x08, 0x08, 0x08, 0x08,// -
  0x00, 0x60, 0x60, 0x00, 0x00,// .
  0x20, 0x10, 0x08, 0x04, 0x02,// /
  0x3E, 0x51, 0x49, 0x45, 0x3E,// 0
  0x00, 0x42, 0x7F, 0x40, 0x00,// 1
  0x42, 0x61, 0x51, 0x49, 0x46,// 2
  0x21, 0x41, 0x45, 0x4B, 0x31,// 3
  0x18, 0x14, 0x12, 0x7F, 0x10,// 4
  0x27, 0x45, 0x45, 0x45, 0x39,// 5
  0x3C, 0x4A, 0x49, 0x49, 0x30,// 6
  0x01, 0x71, 0x09, 0x05, 0x03,// 7
  0x36, 0x49, 0x49, 0x49, 0x36,// 8
  0x06, 0x49, 0x49, 0x29, 0x1E,// 9
  0x00, 0x36, 0x36, 0x00, 0x00,// :
  0x00, 0x56, 0x36, 0x00, 0x00,// ;
  0x00, 0x08, 0x14, 0x22, 0x41,// <
  0x14, 0x14, 0x14, 0x14, 0x14,// =
  0x41, 0x22, 0x14, 0x08, 0x00,// >
  0x02, 0x01, 0x51, 0x09, 0x06,// ?
  0x32, 0x49, 0x79, 0x41, 0x3E,// @
  0x7E, 0x11, 0x11, 0x11, 0x7E,// A
  0x7F, 0x49, 0x49, 0x49, 0x36,// B
  0x3E, 0x41, 0x41, 0x41, 0x22,// C
  0x7F, 0x41, 0x41, 0x22, 0x1C,// D
  0x7F, 0x49, 0x49, 0x49, 0x41,// E
  0x7F, 0x09, 0x09, 0x01, 0x01,// F
  0x3E, 0x41, 0x41, 0x51, 0x32,// G
  0x7F, 0x08, 0x08, 0x08, 0x7F,// H
  0x00, 0x41, 0x7F, 0x41, 0x00,// I
  0x20, 0x40, 0x41, 0x3F, 0x01,// J
  0x7F, 0x08, 0x14, 0x22, 0x41,// K
  0x7F, 0x40, 0x40, 0x40, 0x40,// L
  0x7F, 0x02, 0x04, 0x02, 0x7F,// M
  0x7F, 0x04, 0x08, 0x10, 0x7F,// N
  0x3E, 0x41, 0x41, 0x41, 0x3E,// O
  0x7F, 0x09, 0x09, 0x09, 0x06,// P
  0x3E, 0x41, 0x51, 0x21, 0x5E,// Q
  0x7F, 0x09, 0x19, 0x29, 0x46,// R
  0x46, 0x49, 0x49, 0x49, 0x31,// S
  0x01, 0x01, 0x7F, 0x01, 0x01,// T
  0x3F, 0x40, 0x40, 0x40, 0x3F,// U
  0x1F, 0x20, 0x40, 0x20, 0x1F,// V
  0x7F, 0x20, 0x18, 0x20, 0x7F,// W
  0x63, 0x14, 0x08, 0x14, 0x63,// X
  0x03, 0x04, 0x78, 0x04, 0x03,// Y
  0x61, 0x51, 0x49, 0x45, 0x43,// Z
  0x00, 0x00, 0x7F, 0x41, 0x41,// [
  0x02, 0x04, 0x08, 0x10, 0x20,// "\"
  0x41, 0x41, 0x7F, 0x00, 0x00,// ]
  0x04, 0x02, 0x01, 0x02, 0x04,// ^
  0x40, 0x40, 0x40, 0x40, 0x40,// _
  0x00, 0x01, 0x02, 0x04, 0x00,// `
  0x20, 0x54, 0x54, 0x54, 0x78,// a
  0x7F, 0x48, 0x44, 0x44, 0x38,// b
  0x38, 0x44, 0x44, 0x44, 0x20,// c
  0x38, 0x44, 0x44, 0x48, 0x7F,// d
  0x38, 0x54, 0x54, 0x54, 0x18,// e
  0x08, 0x7E, 0x09, 0x01, 0x02,// f
  0x08, 0x14, 0x54, 0x54, 0x3C,// g
  0x7F, 0x08, 0x04, 0x04, 0x78,// h
  0x00, 0x44, 0x7D, 0x40, 0x00,// i
  0x20, 0x40, 0x44, 0x3D, 0x00,// j
  0x00, 0x7F, 0x10, 0x28, 0x44,// k
  0x00, 0x41, 0x7F, 0x40, 0x00,// l
  0x7C, 0x04, 0x18, 0x04, 0x78,// m
  0x7C, 0x08, 0x04, 0x04, 0x78,// n
  0x38, 0x44, 0x44, 0x44, 0x38,// o
  0x7C, 0x14, 0x14, 0x14, 0x08,// p
  0x08, 0x14, 0x14, 0x18, 0x7C,// q
  0x7C, 0x08, 0x04, 0x04, 0x08,// r
  0x48, 0x54, 0x54, 0x54, 0x20,// s
  0x04, 0x3F, 0x44, 0x40, 0x20,// t
  0x3C, 0x40, 0x40, 0x20, 0x7C,// u
  0x1C, 0x20, 0x40, 0x20, 0x1C,// v
  0x3C, 0x40, 0x30, 0x40, 0x3C,// w
  0x44, 0x28, 0x10, 0x28, 0x44,// x
  0x0C, 0x50, 0x50, 0x50, 0x3C,// y
  0x44, 0x64, 0x54, 0x4C, 0x44,// z
  0x00, 0x08, 0x36, 0x41, 0x00,// {
  0x00, 0x00, 0x7F, 0x00, 0x00,// |
  0x00, 0x41, 0x36, 0x08, 0x00,// }
  0x08, 0x08, 0x2A, 0x1C, 0x08,// ->
  0x08, 0x1C, 0x2A, 0x08, 0x08 // <-

};

static const uint8_t Cyrill5x7[] PROGMEM = {
0x0,
    0x0, // size of zero indicates fixed width font, actual length is width * height
    0x05, // width
    0x07, // height
    0x20, // first char
    0x60, // char count

    // Fixed width; char width table not used !!!!

    // font data
  0x00, 0x00, 0x00, 0x00, 0x00,// (space)
  0x00, 0x00, 0x5F, 0x00, 0x00,// !
  0x00, 0x07, 0x00, 0x07, 0x00,// "
  0x14, 0x7F, 0x14, 0x7F, 0x14,// #
  0x24, 0x2A, 0x7F, 0x2A, 0x12,// $
  0x23, 0x13, 0x08, 0x64, 0x62,// %
  0x36, 0x49, 0x55, 0x22, 0x50,// &
  0x00, 0x05, 0x03, 0x00, 0x00,// '
  0x00, 0x1C, 0x22, 0x41, 0x00,// (
  0x00, 0x41, 0x22, 0x1C, 0x00,// )
  0x08, 0x2A, 0x1C, 0x2A, 0x08,// *
  0x08, 0x08, 0x3E, 0x08, 0x08,// +
  0x00, 0x50, 0x30, 0x00, 0x00,// ,
  0x08, 0x08, 0x08, 0x08, 0x08,// -
  0x00, 0x60, 0x60, 0x00, 0x00,// .
  0x20, 0x10, 0x08, 0x04, 0x02,// /
  0x3E, 0x51, 0x49, 0x45, 0x3E,// 0
  0x00, 0x42, 0x7F, 0x40, 0x00,// 1
  0x42, 0x61, 0x51, 0x49, 0x46,// 2
  0x21, 0x41, 0x45, 0x4B, 0x31,// 3
  0x18, 0x14, 0x12, 0x7F, 0x10,// 4
  0x27, 0x45, 0x45, 0x45, 0x39,// 5
  0x3C, 0x4A, 0x49, 0x49, 0x30,// 6
  0x01, 0x71, 0x09, 0x05, 0x03,// 7
  0x36, 0x49, 0x49, 0x49, 0x36,// 8
  0x06, 0x49, 0x49, 0x29, 0x1E,// 9
  0x00, 0x36, 0x36, 0x00, 0x00,// :
  0x00, 0x56, 0x36, 0x00, 0x00,// ;
  0x00, 0x08, 0x14, 0x22, 0x41,// <
  0x14, 0x14, 0x14, 0x14, 0x14,// =
  0x41, 0x22, 0x14, 0x08, 0x00,// >
  0x02, 0x01, 0x51, 0x09, 0x06,// ?
  0x32, 0x49, 0x79, 0x41, 0x3E,// @
  // MSB bottom, 7 not used. only scroll inhbit
  //  0b01000000, 0b01100100 , 0b01100100,0b01100100,0b01100100,
  0x7E, 0x11, 0x11, 0x11, 0x7E,// A

  0b01111111, // // B
  0b01001001,
  0b01001001,
  0b01001001,
  0b00110001,

  0b01111111, // C
  0b01000000,
  0b01000000,
  0b01111111,
  0b01000000,

  0b01100000, // D
  0b00111110,
  0b00100001,
  0b00111111,
  0b01000000,


  0b01111111, // E
  0b01001001,
  0b01001001,
  0b01001001,
  0b01000001,

  0b00011100, // F
  0b00100010,
  0b01111111,
  0b00100010,
  0b00011100,

  0b01111111, // G
  0b00000001,
  0b00000001,
  0b00000001,
  0b00000001,

  0b01100011, // H
  0b00010100,
  0b00001000,
  0b00010100,
  0b01100011,

  0b01111111, // I
  0b00100000,
  0b00011000,
  0b00000100,
  0b01111111,


  0b01000001, // J
  0b01001001,
  0b01001001,
  0b01001001,
  0b00111110,

  0b01111111, // K
  0b00001000,
  0b00010100,
  0b00100010,
  0b01000001,

  0b01000000, // L
  0b01111111,
  0b00000001,
  0b00000001,
  0b01111111,


  0b01111111, // M
  0b00000010,
  0b00001100,
  0b00000010,
  0b01111111,


  0b01111111, // N
  0b00001000,
  0b00001000,
  0b00001000,
  0b01111111,

  0b00111110, // O
  0b01000001,
  0b01000001,
  0b01000001,
  0b00111110,


  0b01111111, // P
  0b00000001,
  0b00000001,
  0b00000001,
  0b01111111,

  0b01111111, // Q
  0b00001000,
  0b00011100,
  0b00100010,
  0b00011100,

  0b01111111, // R
  0b00010001,
  0b00010001,
  0b00010001,
  0b00001110,

  0b00111110, // S
  0b01000001,
  0b01000001,
  0b01000001,
  0b00100010,

  0b00000001, // T
  0b00000001,
  0b01111111,
  0b00000001,
  0b00000001,


  0b00001111, // U
  0b01010000,
  0b01010000,
  0b01010000,
  0b00111111,


  0b01111111, // V
  0b01001001,
  0b01001001,
  0b01001001,
  0b00110110,


  0b01111111, // W
  0b01000000,
  0b01111111,
  0b01000000,
  0b01111111,


  0b00000001, // X
  0b01111111,
  0b01001000,
  0b01001000,
  0b00110000,


  0b01111111, // Y
  0b01010000,
  0b00100000,
  0b00000000,
  0b01111111,


  0b01110111, // Z
  0b00001000,
  0b01111111,
  0b00001000,
  0b01110111,


  0x00, 0x00, 0x7F, 0x41, 0x41,// [
  0x02, 0x04, 0x08, 0x10, 0x20,// "\"
  0x41, 0x41, 0x7F, 0x00, 0x00,// ]
  0x04, 0x02, 0x01, 0x02, 0x04,// ^
  0x40, 0x40, 0x40, 0x40, 0x40,// _
  0x00, 0x01, 0x02, 0x04, 0x00,// `
  0x20, 0x54, 0x54, 0x54, 0x78,// a
  0x7F, 0x48, 0x44, 0x44, 0x38,// b
  0x38, 0x44, 0x44, 0x44, 0x20,// c
  0x38, 0x44, 0x44, 0x48, 0x7F,// d
  0x38, 0x54, 0x54, 0x54, 0x18,// e
  0x08, 0x7E, 0x09, 0x01, 0x02,// f
  0x08, 0x14, 0x54, 0x54, 0x3C,// g
  0x7F, 0x08, 0x04, 0x04, 0x78,// h
  0x00, 0x44, 0x7D, 0x40, 0x00,// i
  0x20, 0x40, 0x44, 0x3D, 0x00,// j
  0x00, 0x7F, 0x10, 0x28, 0x44,// k
  0x00, 0x41, 0x7F, 0x40, 0x00,// l
  0x7C, 0x04, 0x18, 0x04, 0x78,// m
  0x7C, 0x08, 0x04, 0x04, 0x78,// n
  0x38, 0x44, 0x44, 0x44, 0x38,// o
  0x7C, 0x14, 0x14, 0x14, 0x08,// p
  0x08, 0x14, 0x14, 0x18, 0x7C,// q
  0x7C, 0x08, 0x04, 0x04, 0x08,// r
  0x48, 0x54, 0x54, 0x54, 0x20,// s
  0x04, 0x3F, 0x44, 0x40, 0x20,// t
  0x3C, 0x40, 0x40, 0x20, 0x7C,// u
  0x1C, 0x20, 0x40, 0x20, 0x1C,// v
  0x3C, 0x40, 0x30, 0x40, 0x3C,// w
  0x44, 0x28, 0x10, 0x28, 0x44,// x
  0x0C, 0x50, 0x50, 0x50, 0x3C,// y
  0x44, 0x64, 0x54, 0x4C, 0x44,// z
  0x00, 0x08, 0x36, 0x41, 0x00,// {
  0x00, 0x00, 0x7F, 0x00, 0x00,// |
  0x00, 0x41, 0x36, 0x08, 0x00,// }
  0x08, 0x08, 0x2A, 0x1C, 0x08,// ->
  0x08, 0x1C, 0x2A, 0x08, 0x08 // <-

};


const char* PARAM_INPUT_1 = "input1";
const char* PARAM_INPUT_2 = "input2";
const char* PARAM_INPUT_3 = "input3";

 String inputMessage;
 String textMessage;
 String speedMessage;
 String scrollMessage;

 bool shift=0;

typedef struct                                                          // display colors
{
    uint8_t red;                                                        // red, 0...63 (MAX_COLOR_STEPS)
    uint8_t green;                                                      // green, 0...63 (MAX_COLOR_STEPS)
    uint8_t blue;                                                       // blue, 0...63 (MAX_COLOR_STEPS)

} t_color;


t_color led[NUM_LEDS];

// Hier werden die genutzen LEDS der LED Schlange definiert.
// Set Pixel(x,y) verwendet dann genau die "richtige" LED.
// Die Schlange fängt "unten links" an,
// Koordinatensystem: unten links = 0,0
// gezeichnet wird in 14,y
// Harware LED Nummern in Schlangenlinien,


// Umrechnungstabelle von Setpixel(x,y) in LEDS[]
// =========================================================================
// led[] ORIENTIERUNG zur einfachen Rechnung
/*
90 91 92 93 94 95 96 97 98 99 100 101 102 103 104
75 76 77 78 79 80 81 82 83 84  85  86  87  88  89
60 61 62 63 64 65 66 67 68 69  70  71  72  73  74
45 46 47 48 49 50 51 52 53 54  55  56  57  58  59
30 31 32 33 34 35 36 37 38 39  40  41  42  43  44
15 16 17 18 19 20 21 22 23 24  25  26  27  28  29
 0  1  2  3  4  5  6  7  8  9  10  11  12  13  14
 */

uint8_t m[NUM_LEDS];

// Lauflicht delay zwischen zwei Pixel Spalten
int speed = 70;

// Farbdefinitionen für Steuerzeichen <C> = CYAN
t_color CWHITE   {255,255,255};
t_color CBLACK   {0,   0,  0  };
t_color CRED     {255,0,0};
t_color CBLUE    {0,  0,255};
t_color CGREEN   {0,255,0};
t_color CCYAN    {0,255,255};
t_color CMAGENTA {255,0,255};
t_color CYELLOW  {255,255,0};

#define P_Y_EXTRA 3
#define P_START 1
#define P_INTERLEAVE 2
#define P_NUMY 7
#define P_NUMX 15


void setup_pixel_matrix() {
 // Pixel Raster automaatisch berechnen
 for (uint8_t x=0;x<P_NUMX;x++)
    for (uint8_t y=0; y<P_NUMY;y++)
    if (y%2==0)
      m[y*P_NUMX+x] = P_START +                      // ANFANG
                      x*P_INTERLEAVE +               // X POSITION IN ZEILE
                      y*(P_NUMX * P_INTERLEAVE) +    // BIS ZUR PASSENDEN ZEILE SPRINGEN
                      y*P_Y_EXTRA                    // Pro Zeile ein extra Pixel
                      ;
    else
      m[y*P_NUMX+x] = P_START +                      // ANFANG
                      (P_NUMX-1-x)*P_INTERLEAVE +               // X POSITION IN ZEILE, hier wegen der Schlange ist x umgedreht
                      y*(P_NUMX * P_INTERLEAVE) +    // BIS ZUR PASSENDEN ZEILE SPRINGEN
                      y*P_Y_EXTRA                    // Pro Zeile ein extra Pixel
                      ;

}

// aktuell gewählte Farbe
t_color col = CWHITE;


// Umrechnung von x,y in Schlangenposition,
// =========================================================================
void ledbuffer_setPixel(uint8_t x,uint8_t y,t_color col){
   // range 0..P_NUMX-1,0..P_NUMY-1
  led[x+(y)*P_NUMX] = col;

}
// =========================================================================
// Zeichnet den Pixel Buffer in die Leds. Hier erfolgt die Umrechnung der linearen led[] in die
// Lückenhafte Liste m[] ..
void ledbuffer_update() {
 pixels.clear();
 for (uint8_t i=0;i<P_NUMX*P_NUMY;i++)
    pixels.setPixelColor(m[i], pixels.Color(led[i].red,led[i].green,led[i].blue));

 pixels.show(); // This sends the updated pixel color to the hardware
 yield();

}

// =========================================================================
void    ledbuffer_printFlagCol(uint8_t ch){

  if (ch =='1') {
      for (uint8_t y=0;y<3;y++)   ledbuffer_setPixel (14,6-y, CBLUE);
      for (uint8_t y=3;y<6;y++)   ledbuffer_setPixel (14,6-y, CYELLOW);
  }
   if (ch =='2') {
        for (uint8_t y=0;y<2;y++)    ledbuffer_setPixel (14,6-y, CWHITE);
        for (uint8_t y=2;y<4;y++)    ledbuffer_setPixel (14,6-y, CBLUE);
        for (uint8_t y=4;y<6;y++)    ledbuffer_setPixel (14,6-y, CRED);
  }
}

// =========================================================================
// Zeichnet eine Flagge
 void ledbuffer_printFlag_(char ch,t_color ccol) {

  for (uint8_t i;i<9;i++) {
    ledbuffer_printFlagCol(ch);
    scroll(true);
  }
}

// =========================================================================
//  Scrollt das Display eine Spalte nach links
void scroll(bool upd) {

  for (uint8_t y=0;y<P_NUMY;y++) {
    for (uint8_t x=1;x<P_NUMX;x++)
        led[y*15+x-1] = led[y*P_NUMX+x];

    // Eine leere Spalte nach jedem Buchstaben
    ledbuffer_setPixel (P_NUMX-1,y, CBLACK);
    }

     if (upd) {
        ledbuffer_update( );
        delay(speed);
     }
  }
// =========================================================================
// Zeichnet einen Buchstaben Spalte für Spalte und Scrollt ihn dabei nach links
 void ledbuffer_printChar(char ch,t_color ccol) {
   uint8_t d;
     for (uint8_t x=0;x<5;x++) {
      scroll(false);

      // Hier wird mit pgm_read_byte auf den statischen Programmspeicher zugegriffen um an die zuvor definierten Pixelspalten der
      // Zeichensätzes zu kommen
      if (cyrillic)
         d = pgm_read_byte(6+(ch-32)*5+x +Cyrill5x7);
      else
         d = pgm_read_byte(6+(ch-32)*5+x +System5x7);

      if ((d&64 )  == 64) ledbuffer_setPixel (P_NUMX-1,0, ccol);
      if ((d&32 )  == 32) ledbuffer_setPixel (P_NUMX-1,1, ccol);
      if ((d&16 )  == 16) ledbuffer_setPixel (P_NUMX-1,2, ccol);
      if ((d&8 )   ==  8) ledbuffer_setPixel (P_NUMX-1,3, ccol);
      if ((d&4 )   ==  4) ledbuffer_setPixel (P_NUMX-1,4, ccol);
      if ((d&2 )   ==  2) ledbuffer_setPixel (P_NUMX-1,5, ccol);
      if ((d&1)    ==  1) ledbuffer_setPixel (P_NUMX-1,6, ccol);

       ledbuffer_update( );
        delay(speed);
    }
    // scroll betrween characters, if not inhibited!
    if ((d&128 )  != 128) {
      scroll(true); // zweipixel zwischen den Buchstaben freilassen aussser bei Sonderzeichen
      scroll(true);
    }
}


// =========================================================================
 extern void   ledbuffer_printString(String st,t_color ccol ) {
  //  Serial.print("pstrg ");
 shift =0;
  col = CWHITE;
  for (uint8_t i=0; i<st.length();i++) {

     if (shift==1) {

          // FARBEN UND FLAGGEN
         if (st[i]=='R') { col = CRED;  shift=2; }
         if (st[i]=='G') { col = CGREEN;shift=2; }
         if (st[i]=='B') { col = CBLUE; shift=2; }

         if (st[i]=='W') { col = CWHITE;   shift=2; }
         if (st[i]=='C') { col = CCYAN;    shift=2; }
         if (st[i]=='M') { col = CMAGENTA; shift=2; }
         if (st[i]=='Y') { col = CYELLOW;  shift=2; }
         if (st[i]=='1') {  shift=2;    Serial.println("shift2");ledbuffer_printFlag_( '1',col); }
         if (st[i]=='2') {  shift=2;    Serial.println("shift2");ledbuffer_printFlag_( '2',col);   }
         // wechsel des Zeichensatzes im text möglich
         if (st[i]=='K') {  shift=2;   cyrillic = true; }
         if (st[i]=='L') {  shift=2;   cyrillic = false; }

      }


      // SHIFT IN and OUT, für Kommandos,
      // die nicht gezeichnet werden sollen !
      if (st[i]=='<') shift=1;
      if (shift==0)  ledbuffer_printChar(st[i],col);

      if (st[i]=='>') shift=0;
  }
 }


// =========================================================================
// HTML web page to  2 input fields (input1, input2, input3)
const char index_html[] PROGMEM = R"rawliteral(
<!DOCTYPE HTML><html><head>
  <title>ESP Input Form</title>
  <meta name="viewport" content="width=device-width, initial-scale=1">
  </head><body>
  AIRSIGN SCROLLER, use '<' COMMAND  '>'<P> B=BLUE,R=RED,Y=YELLOW,<P>C=CYAN,M=MAGENTA,G=GREEN,W=WHITE,<P>1=FLAG1,2=FLAG2,K=Kyrill,L=Latin<P>
  <form action="/get">
    Text: <input type="text" name="input1">
    <input type="submit" value="Submit">
  </form><br>
  <form action="/get">
    Delay: <input type="text" name="input2">
    <input type="submit" value="Submit">
  </form><br></body></html>)rawliteral";


void notFound(AsyncWebServerRequest *request) {
  request->send(404, "text/plain", "Not found");
}


// =========================================================================
// =========================================================================
void setup() {


pixels.begin(); // INITIALIZE NeoPixel strip object (REQUIRED)
  // set master brightness control
 // FastLED.setBrightness(BRIGHTNESS);

  setup_pixel_matrix();

  Serial.begin(115200);

  // create access point
  while (!WiFi.softAP(SSID, PASSWORD, 6, false, 15)) {
    delay(500);
  }

  // Send web page with input fields to client
  server.on("/", HTTP_GET, [](AsyncWebServerRequest *request){
    request->send_P(200, "text/html", index_html);
  });

  // Send a GET request to <ESP_IP>/get?input1=<inputMessage>
  server.on("/get", HTTP_GET, [] (AsyncWebServerRequest *request) {

    String inputParam;
    // GET input1 value on <ESP_IP>/get?input1=<inputMessage>
    if (request->hasParam(PARAM_INPUT_1)) {
      inputMessage = request->getParam(PARAM_INPUT_1)->value();
      textMessage  = request->getParam(PARAM_INPUT_1)->value();
      inputParam = PARAM_INPUT_1;
    cyrillic = false;
    }
    // GET input2 value on <ESP_IP>/get?input2=<inputMessage>
    else if (request->hasParam(PARAM_INPUT_2)) {
    //     inputMessage = " ";
      speedMessage = request->getParam(PARAM_INPUT_2)->value();
      speed = speedMessage.toInt();
      inputParam = PARAM_INPUT_2;
    }
    // GET input3 value on <ESP_IP>/get?input3=<inputMessage>
    else if (request->hasParam(PARAM_INPUT_3)) {
    //  scrollMessage = request->getParam(PARAM_INPUT_3)->value();
        textMessage  = request->getParam(PARAM_INPUT_3)->value();
      inputParam = PARAM_INPUT_3;
     cyrillic = true;
    }
    else {
      inputMessage = "No message sent";
      inputParam = "none";
    }
    Serial.println(inputMessage);
    request->send(200, "text/html", "HTTP GET request sent to your ESP on input field ("
                                     + inputParam + ") with value: " + inputMessage +
                                     "<br><a href=\"/\">Return to Home Page</a>");
  });
  server.onNotFound(notFound);
  server.begin();


  // Do plain pixel enumeration tests
  //  test_pixel1();
  //  test_pixel2();

 // Generate some test output
 //   ledbuffer_printString( "HALLO <K>HALLO <L>WELCOME BACK PAULA <R>() () () <1><2>   ", CWHITE);
  //   ledbuffer_printString("ABCDEFGHIJKLMNOPQRSTUVWXYZ       ", CWHITE);
  textMessage =" <R>() <W>HAPPY BIRTHDAY HERBERT! ALLES GUTE!  <R>()";
}


// IDENTIFY LEFT COLUMN

void test_pixel0() {
   pixels.clear();
   pixels.show();
   Serial.print(" setup 1 ");


    pixels.clear();
    pixels.setPixelColor(m[P_NUMX*0], 0,100,0);
    pixels.setPixelColor(m[P_NUMX*1], 0,100,0);
    pixels.setPixelColor(m[P_NUMX*2], 0,100,0);
    pixels.setPixelColor(m[P_NUMX*3], 0,100,0);
    pixels.setPixelColor(m[P_NUMX*4], 0,100,0);
    pixels.setPixelColor(m[P_NUMX*5], 0,100,0);
    pixels.setPixelColor(m[P_NUMX*6], 0,100,0);

    pixels.show(); // This sends the updated pixel color to the hardware
    yield();delay(1000);

    Serial.print(" setup 2 ");

    pixels.clear();

    pixels.setPixelColor(m[90], 0,100,0);
    pixels.setPixelColor(m[75], 0,100,0);
    pixels.setPixelColor(m[60], 0,100,0);
    pixels.setPixelColor(m[45], 0,100,0);
    pixels.setPixelColor(m[30], 0,100,0);
    pixels.setPixelColor(m[15], 0,100,0);
    pixels.setPixelColor(m[0], 0,100,0);

    pixels.show(); // This sends the updated pixel color to the hardware

    Serial.print(" setup 3 ");
    yield();delay(1000);

   // ledbuffer_setPixel (14,6, CMAGENTA); yield();delay(1000); pixels.show(); // This sends the updated pixel color to the hardware


}


// =========================================================================
/*
 * prüfen des M Arrays
 * Zeichnet alle Pixel von links nach rechts Zeilenweise
 */
 void test_pixel1() {

  for (uint8_t i=0; i<15*7;i++) {
    pixels.clear();
    Serial.print (i);
    Serial.println (" ");
    pixels.setPixelColor(m[i], 0,100,0);
    pixels.show(); // This sends the updated pixel color to the hardware
    yield();
    delay(20);

 }
}

void test_pixel2() {
 /*  Prüfen der x,y Funktion
  *   Zeichnet alle Pixel von links nach rechts oben nach unten
  */
  for (uint8_t x=0; x<15;x++)
    for (uint8_t y=0; y<7;y++) {

      ledbuffer_setPixel (x,y,CWHITE);
      ledbuffer_update();
      delay(20);
       ledbuffer_setPixel (x,y,CBLACK);
      }
}

// =========================================================================
// =========================================================================
void loop() {
  yield();
  ledbuffer_printString(textMessage,col);
}